Intro
SwiftRNG is a hardware random number generator that can produce high quality true random numbers. Manufactured as a USB device, it is compatible with most server oriented operating systems and hardware platforms. Full documentation is available here.
Hardware requirements
Compatible with USB 2.0 high-speed and USB 1.1 full-speed interface specifications, when used with a computer system, the SwiftRNG device can be plugged into one of the available USB 2.0, USB 1.1 or USB 3.0/3.1 ports.
OS requirements
- Linux (x86, x64)
- or FreeBSD 12/13
- or macOS 11.6.1 (Intel)
- or Windows 7, 8.1, or 10/11 (SwiftRNG devices manufactured after March 2020 are compatible with 64 bit Windows 10/11 and 64 bit Windows Server 2016/2019)
Windows
Device driver installation for Windows 10 (for SwiftRNG devices manufactured before March 2020)
As soon as a SwiftRNG is plugged into one of the USB ports available, an appropriate driver should be installed automatically by the OS. If the driver is not available on local computer system, the OS may need internet access to download the driver so it can be installed successfully.
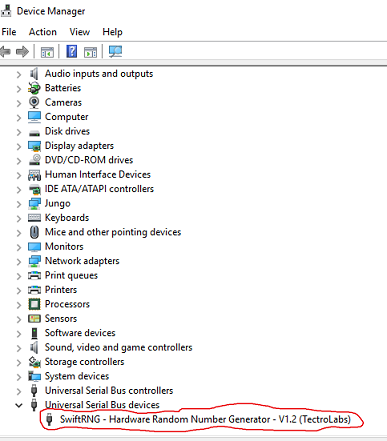
When the Windows driver is successfully installed for the SwiftRNG device, an entry should show up under the Universal Serial Bus devices group in the Device Manager application as shown in the following screenshot:
Device driver installation for 64 bit Windows 10/11 (for SwiftRNG devices manufactured after March 2020)
As soon as a SwiftRNG is plugged into one of the USB ports available, an appropriate driver should be installed automatically by the OS.
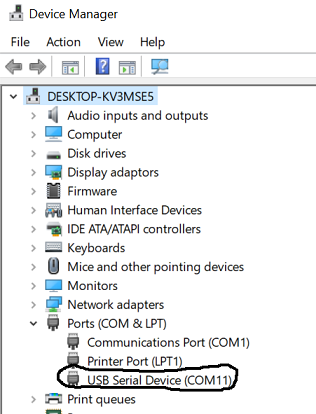
When the Windows driver is successfully installed for the SwiftRNG device, an entry should show up under the Ports (COM & LPT) group in the Device Manager application as shown in the following screenshot:
Device driver installation for Windows 7 and 8.1 (for SwiftRNG devices manufactured before March 2020)
When you plug a SwiftRNG into one of the USB ports available, an appropriate driver should be installed automatically by Windows 8.1 and Windows 7.
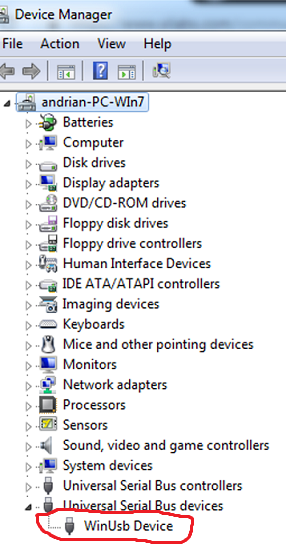
When the Windows driver is successfully installed for the SwiftRNG device, an entry should show up under Universal Serial Bus devices group in the Device Manager application as as shown in the following screenshot (Windows 7):
However, in some cases the driver may not be available on your Windows 7 or Windows 8.1 computer system, and you will need to download and install the driver manually. That can be done with the following steps:
- Download “WinUsb Device driver” from the following location: https://tectrolabs.com/downloads/winusbcompat.zip
- Extract the contents of the downloaded
winusbcompat.zipfile to a temporary folder. - In Device Manager, select “Update driver software …” –> “Browse my computer for driver software”.
- Navigate to the temporary folder with the downloaded driver and complete the installation.
Using pre-built Windows utilities and components
SwiftRNG software kit contains pre-built utilities and components that can be used on Windows. You can download the latest windows-binaries.zip here.
windows-binaries.zip contains three folders:
windows-x64-vs-2019contains DLLs and executables for 64-bit Windows, built with Visual Studio 2019.windows-x86contains DLLs and executables for 32-bit Windows based applications.
To verify if the SwiftRNG device has been installed successfully, locate ‘swrng.exe’ utility which is available in one the folders mentioned above, and run it on command line prompt as following:
swrng.exe -ld
If the device is successfully installed and ready for usage, the output may look like this:
{DevNum=0 DevModel=SwiftRNG DevVer=V1.2 DevS/N=BCDE0A6AE2F1234}
In addition you can also use swdiag.exe to run the SwiftRNG device diagnostics. It should not report any failures or warnings during execution.
Rebuilding SwiftRNG utilities and components from supplied source code on Windows
For Windows 32 bits (for SwiftRNG devices manufactured before March 2020)
You can rebuild SwiftRNG utilities and components for Windows 32 bits using Microsoft Visual C++ 2010 Express. You will need to download the source code here. The Visual C++ project solution (SwiftRNG) is located in the swiftrng-N.N.N\windows-x86\ folder.
For Windows 64 bits
You can rebuild SwiftRNG utilities and components for Windows 64 bits using Visual Studio 2015, Visual Studio 2017 or Visual Studio 2019. You will need to download the source code here. The Visual Studio project solution (SwiftRNG) is located in the swiftrng-N.N.N\windows-x64\ folder (before you rebuild the solution, make sure you select x64 target platform and not Win32 in Visual Studio IDE). SwiftRNG.dll built with Visual Studio 2015 is not compatible with applications built based on Visual Studio 2017/2019 (for example, if you plan to use SwiftRNG.dll with Excel then you will need to make sure the Excel version will be compatible with the specific version of the SwiftRNG.dll).
Linux
Downloading the software kit
SwiftRNG software kit doesn’t include binaries for Linux platforms. You will need to download the source code and build utilities and components for specific OS. The SwiftRNG software kit can be downloaded from this location. Alternatively it can be downloaded with git using the following command:
git clone https://github.com/tectrolabs/swiftrng.git
Locate the source code with the following command:
cd swiftrng/linux-and-macOS/swrng/
Prerequisites
Make sure packages make, gcc, libusb and gcc-c++ are installed before running the build.
Important: due to some issues with the libusb version 1.0.25, we strongly advise installing a libusb version prior to or after 1.0.25.
Ubuntu
On Ubuntu, this can be done with the following commands to install the required dependencies:
sudo apt-get update
sudo apt-get install make
sudo apt-get install gcc
sudo apt-get install g++
sudo apt-get install libusb-1.0
CentOS and Red Hat
On CentOS or Red Hat, use the following commands to install the required dependencies:
sudo yum update
sudo yum install make
sudo yum install gcc
sudo yum install gcc-c++
sudo yum install libusb*
Building utilities and components
To build and install utilities you will need to run the following from the command line:
make
sudo make install
To verify if the SwiftRNG device has been installed successfully, run the following on command line prompt:
sudo swrng -ld
If the device is successfully installed and ready for usage, the output may look like this:
{DevNum=0 DevModel=SwiftRNG DevVer=V1.2 DevS/N=BCDE0A6AE2F1234}
In addition you can also use swdiag to run the SwiftRNG device diagnostics. It should not report any failures or warnings during execution.
Linux kernel module ‘swrandom’
Please navigate to this location for the details about using swrandom kernel module.
macOS
Downloading the software kit
The SwiftRNG software kit doesn’t include binaries for MacOS platform. You will need to download the source code and build utilities and components for your Mac. The software kit can be downloaded here. Alternativelly it can be downloaded with git using the following command:
git clone https://github.com/tectrolabs/swiftrng.git
Locate the source code with the following command:
cd swiftrng/linux-and-macOS/swrng/
Prerequisites
On macOS, the libusb dependency can be installed by running the following from the command line. (make sure the Homebrew is present on the sustem).
brew install libusb
Building utilities and components
To build and install utilities you will need to run the following from the command line:
make
sudo make install
To verify that the SwiftRNG device has been installed successfully, run the following on command line prompt:
swrng -ld
If the device is successfully installed and ready for usage, the output may look like this:
{DevNum=0 DevModel=SwiftRNG DevVer=V1.2 DevS/N=BCDE0A6AE2F1234}
In addition you can also use swdiag to run the SwiftRNG device diagnostics. It should not report any failures or warnings during execution.
FreeBSD
Downloading the software kit
The software kit for FreeBSD 12/13 can be downloaded here. Alternativelly it can be downloaded with git using the following command:
git clone https://github.com/tectrolabs/swiftrng.git
Locate the source code with the following command:
cd swiftrng/linux-and-macOS/swrng/
Prerequisites
The software kit requires no additional components or dependencies when used with FreeBSD 12 or 13.
Building utilities and components
To build and install utilities you will need to run the following from the command line:
make -f Makefile.bsd
sudo make -f Makefile.bsd install
To verify that the SwiftRNG device has been installed successfully, run the following on command line prompt:
sudo swrng -ld
If the device is successfully installed and ready for usage, the output may look like this:
{DevNum=0 DevModel=SwiftRNG DevVer=V1.2 DevS/N=BCDE0A6AE2F1234}
Using SwiftRNG devices in virtual environment
SwiftRNG devices manufactured after March 2020 work with Linux, macOS, Windows 10/11 (64 bit) and Windows Server 2016/2019 (64 bit), and run in virtual machines using software such as VMware Player, VMware ESXi, VirtualBox, and Parallels. We have noticed however a decrease in projected SwiftRNG performance when using virtual machines. For best results, when used with virtual machines, we recommend connecting the SwiftRNG device to a USB port version 3 (or higher) or configuring the USB port as a pass-through device.